
How to install Arduino Studio
Start writing here...
What is Arduino?
Arduino is an open-source platform that makes it easy to build smart electronic projects — from blinking an LED to automating your entire home. It’s based on a development board with a microcontroller and a simple program called the Arduino IDE, where you write and upload code to the board via USB.
It’s ideal for beginners, yet powerful enough for hobbyists and professionals. Arduino is widely used in education, robotics, home automation, the Internet of Things (IoT), and even interactive art. The IDE works on Windows, macOS, and Linux, and there’s also a web-based version you can use directly in your browser.
With a huge global community and hundreds of ready-to-use projects, Arduino is the perfect gateway into the world of interactive technology.
Arduino IDE 1 Installation on Windows
Ready to bring your electronics ideas to life? Let’s get your Windows PC set up with the classic Arduino IDE in just a few easy steps:
Step 1
Get the latest version from the download page. You can choose between the Installer (.exe) and the Zip packages. We suggest you use the first one that installs directly everything you need to use the Arduino Software (IDE), including the drivers. With the Zip package you need to install the drivers manually. The Zip file is also useful if you want to create a portable installation.
When the download finishes, proceed with the installation and please allow the driver installation process when you get a warning from the operating system.
Step 2
Choose the components to install.

Step 3
Choose the installation directory.

Step 4
Installation in progress.

The process will extract and install all the required files to execute properly the Arduino Software (IDE)
The text of the Arduino getting started guide is licensed under a Creative Commons Attribution-ShareAlike 3.0 License. Code samples in the guide are released into the public domain.
And now we are done with the Arduino intstallation on Windows. Let's move on the Linux.
Arduino IDE 1 Installation (Linux)
Quick Start
The Linux build of the Arduino Software (IDE) comes in different packages depending on your system architecture. There are no specific instructions needed for the different distributions of Linux (e.g. Ubuntu).
Download the Arduino Software (IDE)
Get the latest version from the download page. You can choose between the 32, 64 and ARM versions. It is very important that you choose the right version for your Linux distro. Clicking on the chosen version brings you to the donation page and then you can either open or save the file. Please save it on your computer.
These are the steps to install Arduino on Linux:
Step 1
Save the file

Step 2
Extract the package
The file is compressed and you have to extract it in a suitable folder, remembering that it will be executed from there.
Extracting the package

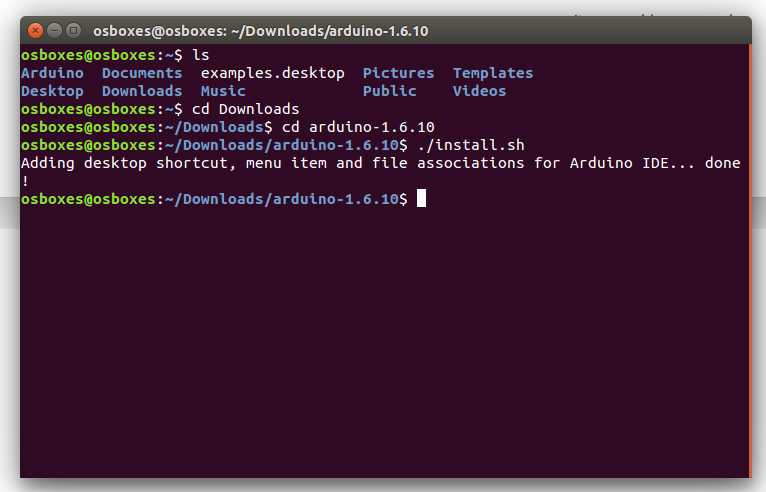
Run the Install Script
Open the arduino-1.x.x folder just created by the extraction process and spot the install.sh file. Right click on it and choose Run in Terminal from the contextual menu. The installation process will quickly end and you should find a new icon on your desktop.
If you don't find the option to run the script from the contextual menu, you have to open a Terminal window and move into the arduino-1.x.x root directory and run the following command:


Step 3
You should find a new icon on your desktop.
Running the installation script.
Please Read
It might happen that when you upload a sketch - after you have selected your board and the serial port -, you get an error Error opening serial port ... If you get this error, you need to set serial port permission.
Open Terminal and type:
ls -l /dev/ttyACM*
you will get something like:
crw-rw---- 1 root dialout 188, 0 5 apr 23.01 ttyACM0
The "0" at the end of ACM might be a different number, or multiple entries might be returned. The data we need is "dialout" (is the group owner of the file).
Now we just need to add our user to the group:
sudo usermod -a -G dialout <username>
where
<username>
is your Linux user name. You will need to log out and log in again for this change to take effect.

This is the procedure to access the serial port from the Arduino Software (IDE) if you get an error
After this procedure, you should be able to proceed normally and upload the sketch to your board or use the Serial Monitor.
The text of the Arduino getting started guide is licensed under a Creative Commons Attribution-ShareAlike 3.0 License. Code samples in the guide are released into the public domain.
Now we go to macOS. You will see that there are way less steps than on Windows and Linux
Arduino IDE 1 Installation (macOS)
Download the Arduino Software (IDE)
Get the latest version from the download page. The file is in Zip format. If you use Safari it will be automatically extracted. If you use a different browser you may need to extract it manually.
Step 1
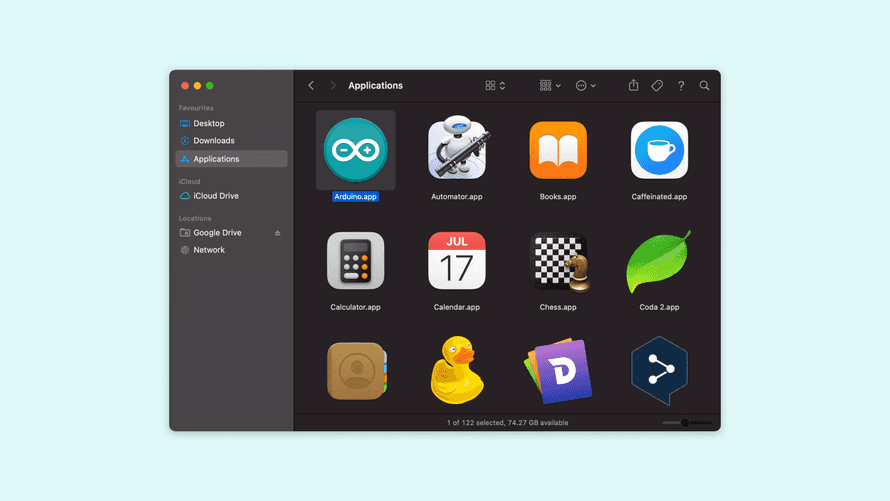
Open the downloads folder.
Copy the Arduino application bundle into the Applications folder (or elsewhere on your computer).

Copy to the Applications folder.
This is how you can esily install Arduino on Windows, Linux and macOS. Thank you for your anttention.